Home

Saturday, July 31, 2010

Snowy Starry Nights and a Goal Achieved

I did it! I did it!! I finished all 33 Dare to Get Dirty challenges hosted by the Dirty Dozen for Fan Club members! Woo-hoo!  After work, I spent a lot of my spare time working on these, and I just feel so doggone good that I achieved my goal. :-)


I also decided to try and give my brayer another try. I so love Zindorf's stunning scenes she creates with her brayering technique. I've never had the opportunity to take one-on-one instruction from her, but I just tried to follow along with tutorials she has done. I found it easier to use the sponge brayer roll that SU use to sell rather than the smoothy brayer roll. After I brayered the various colors, I used my stamp-a-ma-jig to line up and stamp these pretty Rubbernecker Kittie Kits trees. I added snow to the tree branches and the sky with a white gel pen. I used my Going Gray reinker and a blender pen to add the shading under the trees. All of my stitching is faux as are my buttons.

Since I didn't quite capture the texture of the beautiful starburst transluscent white paper I used, here's a close up.


Now, it's off to claim my DTGD Queen crown from SCS!!  Giggle.

I hope you're having a terrific day!


Friday, July 30, 2010

Kraft and Wings

Have you participated in any of the Dare to Get Dirty challenges on Splitcoaststampers? There are 33 of them and, if you are a Fan Club member, you have until August 1st to complete them. As much as I have tried to participate in these challenges in the past, I have been unsuccessful in completing them for one reason or another. It's been my goal this year to do ALL 33 and I am soooooooo close. The card I have to share today completes 32 of the 33 challenges for me, and I hope to make #33 either tonight or tomorrow.  So, if I haven't been to your blog or your on-line gallery lately, it's because I've been a stampin' fool in the little spare time that I have.  I'll be back to see what you've been up to soon, though!


I white embossed the Polka Dots & Paisley flowers onto kraft cardstock and added pink brads to the dotted portion under the bloom.  Isn't this kraft tafetta ribbon pretty?  I just had to order some when I saw it was on the Stampin' Up retired list, and I wish I would've ordered more than one.  It is so pretty and works well with the Bow Easy. 

Cardstock:  Craft, Pink Pirouette, Pink Pirouette dp
Accessories:  butterfly punch, circle Nestabilities, pink brads, distressed stripes embossing folder, pink liquid pearls, kraft tafetta ribbon


Thursday, July 29, 2010

Woven Floral

Joanne (JoJot) gave us a beautiful woven sketch design challenge this week with flowers as the twist for our CCEE challenge.  The flowers can be the image, the background, an accent, on the ribbon, or any combination.   I love my new (new to me) Fifth Avenue Floral set and this flower image, in particular.  It's fun to stamp directly onto colored cardstock or patterned paper and sponge the edges for depth.


If you would like to play along all you have to do is create a card using the above challenge and upload it to your blog and/or to your SCS Gallery using the keyword CCEE1030. Please check out the beautiful creations my friends Joanne, Cindy, Shirley, Tosh and Frances made on our CCEE blog.

Monday, July 26, 2010

Stamping Machine!

I was able to spend some time stamping this weekend and participating in more of the Dare to Get Dirty challenges that the Dirty Dozen gals from Splitcoaststampers are hostessing for Fan Club members.  These challenges varied in theme, sketch, color, and technique.  So, here you have it.....from country life to yummy birthday cupcakes to Christmas and back to a summer floral garden.....


Stamps:  Rooster Sunrise by Anna Griffin, Chicken Wire bg by Rubbernecker
Cardstock:  Riding Hood Red, Whisper White, gingham dp
Ink:  Memento Black, Riding Hood Red
Accessories:  gingham ribbon, circle Nestabilities, circle punches, modern label punch, scalloped border punch, dimensionals, paper piercer, black marker


Stamps:  Well Scripted, Party Hearty
Cardstock: Only Orange, Chocolate Chip, Whisper White, Real Red
Ink: Memento Black
Accessories: orange and brown polkadotted ribbon, circle punches, Sweet Treats Cricut cartridge, dimensionals, swirls embossing folder, candy sprinkles


Stamps:  Christmas Punch
Cardstock:  Blue Bayou, Soft Sky dp, Whisper White
Ink:  Blue Bayou
Accessories:  large tag punch, white eyelet, ribbons, scalloped border punch


Stamps:  Rubbernecker
Cardstock:  Whisper White, Regal Rose, pink dp
Inks:  Pretty in Pink, Regal Rose, Old Olive
Accessories:  olive ribbon, butterfly punch, sponge, dimensionals


Saturday, July 24, 2010

Altered Items

Happy Saturday to you!  I've been busy in my craft room working on altering a couple items this morning.

First up, is a metal tin I colored with Ranger alcohol inks and blending solution.  I used a cotton ball to get good coverage all over.   These inks cover beautifully and dry fast so you're not waiting for your project to dry to finish it.  My Oval All sentiment was colored with Copic markers and accented with Ranger stickles.  I used my Bow Easy to make my bow.  Doesn't this make for a pretty gift-giving package?


Second, is this chest of drawers that I bought at a garage sale several years ago for 25 cents with the intention of decorating it.  I had no idea how stamping on this would turn out, but thought I'd give it a try.  The chest of drawers were originally dark brown.  This chest stands 17 inches tall so it was a little difficult to photograph; therefore, I took several snapshots.


I started by spray painting it with flat white paint and then stamped my flowers using bits and pieces of stamps from Love Without End, Polkadot Posies, and Heartfelt Thanks in Lavender Lace, Elegant Eggplant, and Sage Shadow.  I sponged Sage Shadow onto the drawer knobs and then added a dot of Lavender Lace with a q-tip.  I adhered eggplant and lavender striped designer papers to the side and top shelf punching the edges with a scallop punch.  My five-petal flower punch flower is layered three times with dimensionals and centered with a 1/2" circle punched out of the pretty striped designer paper.  I sponged Elegant Eggplant to the tops of each drawer and around parts of the top of the chest.  Last, I adhered this button at the top.

Here is a side view of the designer paper.  I didn't do it here, but I'm thinking of typing drawer labels to identify the various extra punched scraps I accumulate when I'm working on a project and adhering the labels with maybe the word window punch on the side.


a top view


and a close up of the stamping on the drawers


Thursday, July 22, 2010

Christmas in July and still daring....


Actually, I love making Christmas cards any time of the year.  They are some of my favorite projects to do.  Joanne Grzelak, aka JoJot, challenged the CCEE gals to make a Christmas in July card using this fabulous sketch design.  Do you recognize the designer paper?  Yep, some of the retired SU True Thyme and Cranberry Crisp dp.  I had a few scraps of it left, so used it in my design.  We'd love it if you played along with us.  You can get all the deets right HERE as well as view the beautiful cards my team mates, Tosha, Joanne, Cindy, Shirley, and Frances have made.

And, yes, I'm still daring to get dirty with the Dirty Girls on Splitcoaststampers (SCS) by trying to participate in as many of the fabulous challenges they've come up with for the SCS Fan Club members. As a full-time working-outside-of-the-home gal, it's hard to keep up with all of them, and I so wish I could just stay home this week and play in EVERY challenge!!! The DD gals have really outdone themselves with some terrific challenges.


Tuesday, July 20, 2010

Bright and Dirty


Teapot Tuesday is all about hearts this week!  Mothermark has posted a brightly colored and cute teapot and has challenged us to bring hearts to the tea party for crazykim's sweet little girl in New Zealand who just had her tonsils out and could use some cheering up.  Generally, children gravitate to the bright, bold colors, so I was glad to see them in the inspiration teapot.  Here's wishing Georgia a speedy recovery and that she'll enjoy receiving all these cards coming her way!

I used Stampin' Up heart and circle punches, as well as my heart embossing folder in this CAS design.


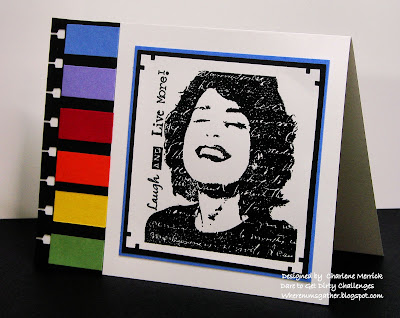
I have a TV theme song for my next card.  Do you recognize it?

Who can turn the world on with her smile?

Who can take a nothing day, and suddenly make it all seem worthwhile?
Well it's you girl, and you should know it
With each glance and every little movement you show it

Love is all around, no need to waste it
You can have a town, why don't you take it
You're gonna make it after all

Did you recognize these lyrics? If you guessed the Mary Tyler Moore Show, you would be right! This was one of my favorite TV shows from the 1970s. The color panels on the left represent the colors used in the Mary Tyler Moore opening titles.

The image is black embossed, and she reminded me of when Mary would fling her hat in the air with a big ol' smile on her face that she had "finally made it after all!"


My last card in this post is for several challenges, one of which was to use gingham in our creation.  Whenever I see gingham, it reminds me of Gingham Girl, aka Schirmcat, aka Kelly, so I had to give my sweet Joline (My Favorite Things) image blonde hair in honor of Kelly.


I'm not sure how well you can see them, but the flower has red glitter on it, and her black patent leather shoes are shined with crystal effects.

If you're a Fan Club member on Splitcoaststampers, now is the time to be checking out all the terrific Dare to Get Dirty challenges that the Dirty Dozen members and alumni are hostessing this week!

Sunday, July 18, 2010

Dare to Get Dirty


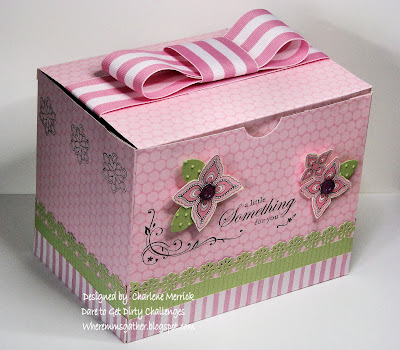
Dare to Get Dirty, you ask?  Well, if you're a Splitcoaststampers (SCS) fan, you already know that this is a week of challenges being hosted by the Dirty Dozen gals.  This is actually day 2 of the challenges, and I believe there are about nine of them posted already.  I compiled three of the challenges into my altered project above.

Kittie747 posted a Lost and Found challenge to use something around your home into your design.  I chose to decorate this Staples envelope box:


DeborahLynneS is hostessing the A Piece Offering challenge to use paper piecing on our project. I actually paper pieced this entire box, in my opinion. The flowers on the front of the box were cut out from this same set of SU designer paper.


AmberDawn's challenge is entitled In Touch with Texture. My texture includes my embossed leaves, my ribbon, my buttons, and my flowers popped up on dimensionals.

As my friend, Cindy (Mothermark), would say...."42,000 hours later and I've finished!"  I think I am way too much of a perfectionist to engage in making too many of these.

Here are some other views of my gift box.  The first one is a close up of the flowers I cut out of the designer paper and popped up on dimensionals.  My leaves were punched with the 1" circle punch, embossed with dotted swiss embossing folder, and punched again to shape the leaf.


I am terrible at tying ribbon.  Even with my Bow Easy, my bows never look quite right to me.  This is how I chose to do the ribbon.  I adhered it with Aleene's Tacky Glue and sticky strip tape.


Supplies:
Stamps:  Yummy, Time Well Spent
Cardstock:  SU designer paper, striped dp, bottom of envelope is reinforced with Pretty in Pink cardstock
Ink:  Memento Black
Accessories:  striped ribbon, circle punch, dimensionals, flower border punch, sticky tape, Aleene's tacky glue


Saturday, July 17, 2010

I had so much fun getting together with my friend, Lynn, this morning.  We had a scheduled craft date and wanted to work on making one of the stationery boxes we saw demonstrated on Splitcoaststampers (SCS).  Long story short:  I so wish I had videotaped our session so I could show you all the errors we made.  We would have made for a terrific video tutorial on how NOT to make a stationery box!  We got to laughing so hard that we had tears streaming down our cheeks.  I still have to embellish/decorate my box and make the cards for the inside and just may show you the end product when I do complete it.

I did have a chance to make a card in honor of our Queen for the Day before I hooked up with Lynn this morning.  Anne Ryan is the Queen for the Day challenge hostess on SCS, and she chose Sallie, aka hobbydujour, as this week's Queen.  Sallie has a fabulous gallery, and I was surprised to learn that she's only been stamping about a year.  As challenge rules dictate, we are to select a card to case from the Queen's gallery.  I chose her latest upload called Birdie.  I changed colors and images using this classy and elegant image by Rubbernecker.  The background collage stamp is also by Rubbernecker.   As I wrote in my post on SCS, this image reminds me of our QFTD challenge hostess, Anne. I've never met Anne, but I can tell that she oozes class and elegance as does this image.

The image is watercolored with Pale and Perfect Plum reinkers and watercolor brush, except for the skin tones on her face for which I used Copic markers.  I added Martha Stewart glitter to her collar for some added pizzaz.


This next card I made for the Free for All challenge on SCS to use snowflakes and pearls in our design.  I really wanted to do something out of the ordinary and came up with the idea of using a black embossed background accented with gold Perfect Pearls.  My friend, Em (aka StampMuse) sent me this terrific gold metallic paper, and the angel image and sentiment are both by Rubbernecker.  I colored her with Copic markers and added gold glitter to the top of her wings.


Thanks for stopping by!  I hope you've had a terrific Saturday!

Thursday, July 15, 2010

A Monochromatic Sketch

Thursday brings me to my weekly CCEE (Cheers & Challenges Electic Ensemble) challenge with my friends.  Joanne Grzelak is our July hostess, and she has given us a month of weekly sketch design with a twist challenges.  Here's this week's sketch design and the twist is to make our card monochromatic in color.

Here's my card:


I, obviously, went with blue using SU's Bordering Blue cardstock.  I white embossed  my Fifth Avenue Florals onto vellum cardstock.  I colored the flowers on the back of the vellum using my metallic pencils and blender pen.  I added shading with Adirondack Denim blue reinker and blender pen.  After I finished coloring, I ran the piece of vellum cardstock through my Cuttlebug with a diamond platter embossing folder.  The dual embossing (heat and dry) I did on the vellum was part of a technique challenge on Splitcoaststampers by my friend, Joan.  I adhered the vellum cardstock onto white cardstock with white brads.

Other supplies I used are the SU bird and oval punches, Spellbinder's Fancy Tags die, organdy ribbon, sponge, and dimensionals.

I hope you can find some time to play along with us this week.  There's no time limit.  Check out the details and my friends' beautiful creations on our CCEE blog here.


Thursday, July 8, 2010

An Electic Mixture

Here are a few cards I've made this week and finally getting posted to my blog.

1.  This is for our weekly CCEE challenge hosted by JoJot to create a summer-themed project using this sketch design.  I love getting together with family and friends on a beautiful, summer day and having a cookout or picnic.  Please be sure to check out the designs my friends made on our CCEE blog; we'd love it if you played along with us, too!


2.  I made my next card for one of the "funnest" challenges ever on Splitcoaststampers (SCS) called Teapot Tuesday.  Mothermark is the challenge hostess, and man, is she funny!  She always has these terrific teapots for our inspiration and associates some pretty goofy stories to go along with them.  It's been great to see the number of challenge participants growing and how everyone gets into the goofy groove, as I call it.  We have so much fun!  You can get the details on this week's challenge here.

This week, we were going "dotty."  I stamped directly onto black and white polkadotted designer paper.  I hand drew the hills and outlined with slashes and x's, which is not my original idea.  I got the idea from Cathy (aka Mutnik) when she was featured stamper on SCS a while back..  I colored the entire scene (except for the sun) with a mixture of watercolor wonder crayons, followed by reinkers and blender pen.  The sun was made with my 3/4" circle and boho blossoms punches.


3.  My last card was for yesterday's sketch challenge on SCS, as well as using the distressed linen technique that Gina K demonstrated on Stamp TV.  Basically, you do an emboss resist technique on designer paper and then color with distress inks.  It was fun to do!  I started with a piece of Basic Grey's Nook and Pantry; I have a small piece of it laying at the base of my card so you can see how my background paper started out. I clear embossed this Rubbernecker shasta flower onto the designer paper, let it cool, then I sponged my distress inks (tattered rose and weathered wood) over that. I really like the effect of how you can still see the original designer paper pattern after you've embossed and sponged it with ink.

I stamped an extra shasta flower onto bordering blue, cut it out, rubbed wax paper over it to give it a little shimmer, sponged the outer edges with the weathered wood distress ink, bent back the edges of the flower with my bone folder, added hematite glitter to the center, and popped up on a dimensional.
I black embossed my sentiment (also by Rubbernecker) on vellum and adhered that to the back of my die cut oval panel. 


I always appreciate your visits and comments; thanks!  Have a great day!


Monday, July 5, 2010

Paper and Vellum Posie

Hello, dear friends!  Thanks for stopping by my blog today.  I hope those of you who celebrated Independence Day yesterday enjoyed your day.  We had fun by having family over on Saturday for a cookout and to celebrate June and July birthdays.  It was such a beautiful day weather wise for us.  We had clear, blue skies with warm temperatures accentuated with a light breeze to keep us comfortable as we sat outside. 

Anywhooo, as a result of the holiday, I have today off from work, and I plan to make cards!  The first card I completed today is for two challenges on Splitcoaststampers:  (1)  the Clean and Simple challenge to choose one of the outrageously beautiful wedding cakes from Carrie's CakesHere's the cake I chose because I love black and white accented by pink; and  (2)  the Technique challenge to make our own paper posie.  Here's my card:


I used my 1/4" circle punch on black cardstock to add the larger dots to my dotted paper, and I cut 3/4" strips of black cardstock for the stripes on the top layer.

and here's a couple close ups of the flower I made:


And, if you're interested in knowing how I made my posie, here are the parts I used to make it:


Supplies:  vellum punched with the five-petal flower punch and one of the boho blossoms flowers embossed with dotted swiss embossing folder; regal rose cardstock punched with the scalloped circle and the 1/4" circle; pink glitter; glitter glue; barely banana brad. 

The vellum and cardstock was sponged with regal rose ink on the outer edges.  You can see in the photo how I cut slits between every two scallops on the regal rose cardstock.  This helps with shaping your card once you're ready to put it together.  The vellum five-petal flower petals were folded upwards with my bone folder and then just the tips bent backward to shape them.  For the little boho blossoms piece, I added tiny dots of the glitter glue and applied the pink glitter for a bid of sparkle.

I'm off to do some more creating.....possibly using stamps this time!.....and plan to stop by your blogs later to see what you've been up to!

Saturday, July 3, 2010

Oompa Cat

Hi!  I hope you are having a fantabulous weekend; I appreciate your visit to my blog today.  We have family due to arrive shortly for a cookout, but I did have a little time this morning to participate in the Inspiration challenge on Splitcoaststampers.  Stef gave us another terrific website for our inspiration called Oompa.   I absolutely love the darling artwork by Noelle Dass at Oompa!!! All of her animal drawings are adorable. I chose this Cat Blue Print for a friend who is a cat lover.


I replicated her cat image using punches and Nestabilities. I made mine a full body image adding the kitty's paws.  Isn't he funky?


Cat Parts:

ears = five-star flower punch
eyes = double circle punch
face = oval Nestabilities
neck = arrow punch
body = circle Nestabilities
paws = 3/4" circle punch
whiskers = free-hand cutting

I inked up my dotted swiss embossing folder with Night of Navy and ran my Bashful Blue cardstock through my Cuttlebug. I added additional sponging around the cat to outline it like Noelle did in her drawing.