Home

Monday, December 31, 2012

Look After My Heart

I made this little love note for my husband using the chalkboard technique, which is the challenge today at Splitcoaststampers.  It's an easy technique:  you heat emboss your image and/or sentiment with white embossing powder and then dust on white ink for your chalkboard.  Easy peasy!!


 A friend of mine gave me this arrow punch several years ago and I've hardly used it.  It was perfect for my arrow on my heart-shaped love note today.  I used an actual feather for the quiver.  It was kind of peachy in color, so I colored it with my Chamois Copic marker.  The sentiment is by My Favorite Things called Clearly Sentimental About Romance.  Hubby and I are big fans of the Twilight series, having read all the books and seen all of the movies, so this sentiment is perfect!

Wishing you love and happiness,
 

Sunday, December 30, 2012

I'm Still Here

Hello friends!  I hope you've been enjoying your holidays.  Ours have been good.  I love the special time with family, the decorations, the Christmas music, and even got into doing some baking this year, which I haven't done in several years.  

I have been so remiss about posting to my blog these past couple weeks. I just haven't felt like it. Do you ever feel that way? Probably part of it was due to the busy time of the holidays and shortage of time, but there was a part of me that just didn't "feel" like it.

I have, however, been busy making cards in my spare time.  I especially love making Christmas cards and have a few to post here today.  I'll be posting them throughout the year, as well, since I signed up for the Christmas Card Challenge (CCC) at Splitcoaststampers (SC).  It's a great challenge forum for motivating you to make so many cards a month.  You get to choose how many cards you want to commit to making.  I committed to making four a month and already made mine for January!  The January CCC challenge was to  use non-traditional Christmas colors in our designs.  I chose lavendar.  For these cards, I inked up my embossing folder with the Lavendar Lace ink, misted with a little water and ran through my Big Shot.  I love the mottled effect.  These were simple and quick to make.  They'll also be great for mailing because they're pretty flat.

(click on photos for a larger view)

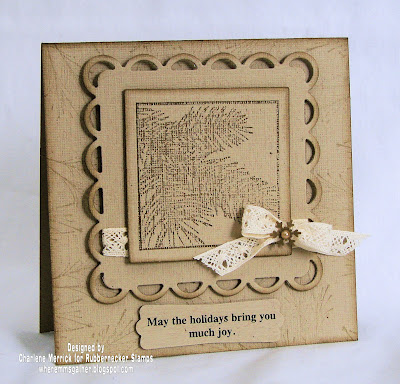
 My next card I made in honor of today's Featured Stamper challenge on Splitcoaststampers. I was so happy to see my talented friend and CCEE sister, Sabrina (Cook22)chosen. She has a HUGE gallery from which to glean inspiration.  I chose to case her elegant and gorgeous Simply Peaceful card.  Here's my version with the changes I made to make it my own design.


I found myself wishing I had Sabrina's elegant Fleur de Lis Square Nestability. I used my Lacy Squares instead. I used Crumb Cake instead of white card stock. I added ribbon (thereby fulfilling my New Year's resolution to use my ribbon!!). I punched a tiny snowflake out of Soft Suede, adding a pearl to the center of it, and then adhered to the center of the snowflake. I used Rubbernecker's Evergreen Bough Block image for my main panel and their Pine Sprig image for my base background.  The sentiment is a rub on.

For my next card, I was inspired by an all-white challenge.  I got the idea to use this border punch on both sides of my card for a different look.  I stamped the ornament with Versamark and heat embossed it with iridescent ice embossing powder, which shimmers IRL. 


That's it for now.  I'm not going to post everything I've made because I know your time is valuable, too.  What I do keep current is my on-line gallery at Splitcoaststampers in case you do want to see what else I made lately.  Here's a link to my gallery.

The new year will soon be here.  I hope yours is filled with good health, peace, love, and joy.


Thursday, December 13, 2012

CCEE Santa

For the last CCEE Stampers' challenge in December, Frances challenged us to use a Santa image in our design.  The CCEE Stampers' will be taking a holiday break until the end of December, but we'll be back the first Thursday in January 2013 and hope you'll join us!


I love this traditional Santa image by Rubbernecker.  I heat embossed Santa with gold embossing powder and colored him with Copic markers. For his beard and hat, I used a bleach technique to whiten it on my ivory card stock.  Since the image is large and takes up most of the card, I kept my layout very simple.

Have a very Merry Christmas and Happy New Year!

 Supplies I used:
Stamps:  Santa by Rubbernecker
Paper:  Wild Wasabi, Very Vanilla, Vintage Snowflake dp
Ink:  none
Accessories:  Copic markers, Versamark, gold embossing powder, heat tool, ticket corner punch, bleach, brush, May Arts silk ribbon


Thursday, December 6, 2012

CCEE Favorite Die

Cindy Haffner is the December challenge hostess for the CCEE Stampers, and she gave the challenge to use our favorite die(s). My current favorite dies are the Holiday Ornaments Framelits by Stampin' Up, so I used mine to make a Christmas card. I love that you can get the coordinating stamps with them.


 (click on image for a closer view)

I stamped the ornament image onto Night of Navy designer paper with Versmark and heat embossed it with silver embossing powder. I sponged the outer edges of the ornament with Night of Navy ink. I created my frame using the largest rectangle Nestability in the classic set, and popped up the frame with dimensional tape. I wanted to keep the design clean and simple, so I only added a little bit of dry embossing on the white card stock.

If you'd like to play along with us or see what the other design team members made, check it out on our CCEE Stampers' blog!

Supplies I used:
Stamps:  Holiday Ornaments and Holiday Happiness by Stampin Up
Paper:  White, Night of Navy, Night of Navy designer paper, silver glitter
Ink:  Chipped Sapphire Ranger Distress Ink; Night of Navy Stampin' Up dye ink
Accessories:  Stampin' Up Textured Impressions Delicate Designs embossing folder, Holiday Ornaments Framelits, Versamark, silver embossing powder, heat tool, dimensional tape and squares, silver cord, 1/4" circle punch


Wednesday, December 5, 2012

Make Your Own Snowman

I made this gift box and card yesterday for the technique challenge at Splitcoaststampers to make our own snowman.


I used various sizes of circle Nestabilities for the snowmen bodies. I used Eva Gray large and small burgundy brads for their bodies. I used rectangle Nestabilities to make my hats. I used a Martha Stewart snowflake punch for the snowflakes on their hats. I used markers for their eyes, mouths, and noses. I used twine for their scarves.

On the card, I die cut the three circles, slightly overlapping them, out of the Jillibean designer paper. Then I added my snowman, popping him up on dimensionals. You can't see it in my photo, but I embossed his hat with the square lattice embossing folder.

For the bottom part of the box and the base of the card, I used snowflake stamps to create a coordinating designer paper with my snowman designer paper.

Here's a closer view of the box:


And a closer view of the card:


 Supplies I used:
Stamps: Snowflakes by Rubbernecker
Paper: Baroque Burgundy, Kraft, Jillibean dp
Ink: Baroque Burgundy, Craft White
Accessories: Pumpkin Pie marker, Marvy Black marker, circle and rectangle Nestabilities, snowflake border punch, twine, May Arts silk ribbon, Eva Gray brads, square lattice embossing folder, dimensionals, ScorPal tape, double circle punch